Returning Shoppers in a Hosted Payment Page
Maintain shopper loyalty by providing a seamless, efficient experience for returning shoppers when they repurchase goods/services, or when they need to change their account details. As long as your shoppers have given you approval to securely store their payment data, BlueSnap provides you with a few ways to improve the checkout process.
-
Pre-populate the checkout page with the shopper's information, including their name, credit card, and billing address. This can boost your conversions by making it easier and faster for the shopper to complete checkout.
-
Direct a returning shopper to their Shopper Portal, so they can conveniently view and/or change their account details.
Pre-populating the checkout page
This section covers how to pre-populate the checkout page for a returning shopper with information, such as name, credit card, and billing address.
1. Get the shopper’s ID from the webhook
The first time a shopper places an order, BlueSnap stores the shopper’s details and generates an ID that represents that shopper. We’ll send you the shopper ID in an webhook after that first order (it appears in the accountId parameter in the webhook).
Be sure you have enabled webhooks and that you save the shopper ID so you can retrieve it when the shopper returns to your site to make another purchase later. Refer to Setting up Webhooks.
2. When the shopper returns, get an encrypted token
Use BlueSnap’s Encrypt Parameters API to generate an encrypted token.
For complete instructions on using the API, refer to Encrypt Parameters.
API credentials
To do this, you’ll first need to obtain API credentials. Refer to Getting API credentials.
You must send a request to the Encrypt Parameters API and include these parameters:
shopperid: Shopper’s ID, retrieved from the webhookpageName: Name of the page where the shopper should land; should be set to AUTO_LOGIN_PAGEexpirationInMinutes: Number of minutes that the pre-populated checkout page is available for returning shoppers; maximum is 1440 minutes (i.e. 24 hours)
Note: The limit does not apply to new shoppers.
This is an example of the content of the API request to get the encrypted token:
<param-encryption xmlns="http://ws.plimus.com">
  <parameters>
    <parameter>
      <param-key>shopperid</param-key>
      <param-value>12345678</param-value>
    </parameter>
     <parameter>
      <param-key>pageName</param-key>
      <param-value>AUTO_LOGIN_PAGE</param-value>
    </parameter>
    <parameter>
      <param-key>expirationInMinutes</param-key>
      <param-value>1440</param-value>
    </parameter>
</parameters>
</param-encryption>Note:
You can also include any of the parameters described in Hosted Payment Page Parameters.
The API responds to this request with an encrypted token. For example:
<?xml version="1.0" encoding="UTF-8" standalone="yes"?>
<param-encryption xmlns="http://ws.plimus.com">
<encrypted-token>WwU0U8O4oU1MXpe6e1stIzUVTHMvdqVsIKGQ6eSxJCxYJOoDcwEiTKusP31u8mcNY%2FxSuOiTzRuQIH%2BangeCpU8cgk0mcEMaUItNmLT9kShUErBWiMP%2BcV0QaMegAv4SeBKbtNsYljXYuWf6wEtNcU4A5FJcY2XvpPJkMv%2B1VIrXXe8TRUn0RFQTiwGMVU48bdzvMP5%2FvSOm1iy0mlDVG%2FezA%2BfNl0xrp0GCuv5efyQQUa4v%2Bl%2FjvYPvTvyHaKi9lmCqtVkgelysxupioCqrctp%2BRzOhze1pNvayYU3Vo%2FM%3D</encrypted-token>
</param-encryption>
3. Add the token to the checkout page URL
Add the encrypted token to the checkout page URL in the enc parameter, as follows:
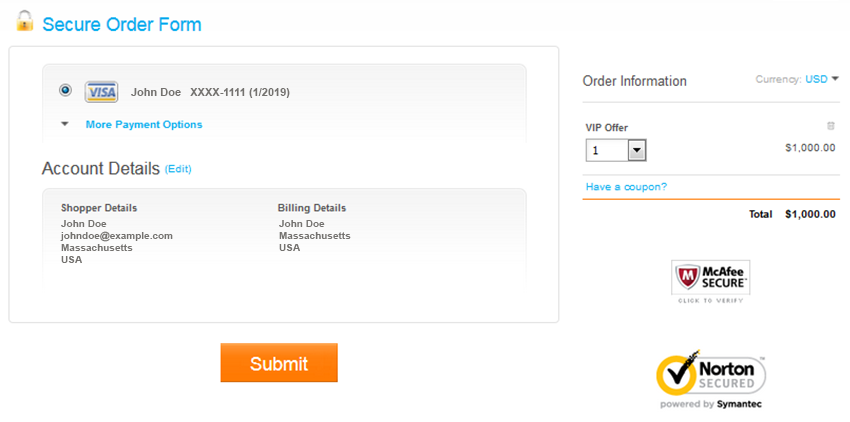
https://sandbox.bluesnap.com/buynow/checkout?storeId=12345&skinId=67890&enc=WwU0U8O4oU1MXpe6e1stIzUVTHMvdqVsIKGQ6eSxJCxYJOoDcwEiTKusP31u8mcNY%2FxSuOiTzRuQIH%2BangeCpU8cgk0mcEMaUItNmLT9kShUErBWiMP%2BcV0QaMegAv4SeBKbtNsYljXYuWf6wEtNcU4A5FJcY2XvpPJkMv%2B1VIrXXe8TRUn0RFQTiwGMVU48bdzvMP5%2FvSOm1iy0mlDVG%2FezA%2BfNl0xrp0GCuv5efyQQUa4v%2Bl%2FjvYPvTvyHaKi9lmCqtVkgelysxupioCqrctp%2BRzOhze1pNvayYU3Vo%2FM%3DThe checkout page is then automatically pre-populated with the shopper’s information. For example:

Directing Returning Shopper to Shopper Portal
This section covers how to direct a returning shopper to a specific page in their Shopper Portal.
1. Get the Shopper's ID from the webhook
The first time a shopper places an order, BlueSnap stores the shopper’s details and generates an ID that represents that shopper. We’ll send you the shopper ID in an webhook after that first order (it appears in the accountId parameter in the webhook).
Be sure that you have enabled webhooks and that you save the shopper ID so you can retrieve it when the shopper returns to your site to make another purchase later. Refer to Setting up Webhooks.
2. Get an authentication token
Using this accountId, retrieve an authentication token for the shopper by sending a GET request with the following parameters:
shopperID: Shopper's Account ID retrieved from the webhookexpirationInMinutes: Number of minutes that the token remains active
This is an example of the API request to get the authentication token:
curl -v -X GET https://ws.bluesnap.com/services/2/tools/auth-token?shopperId=123455&expirationInMinutes=5 \
-H 'Content-Type: application/xml' \
-H 'Accept: application/xml' \
-H 'Authorization: Basic dXNlcm5hbWU6cGFzc3dvcmQ=' \
-d '
Grab the authentication token from the response. This token is added to the Shopper Portal URL as shown in the next step.
Sample response:
<?xml version="1.0" encoding="UTF-8" standalone="yes"?>
<web-authentication xmlns="http://ws.plimus.com">
 <token>5Y2S0yjtygcpUniE5qm6S8jCFyFvgow1L4OnxsCeACZk9AuGFCd7FtxFX0gXV6kLbsU5vGFIfIZ6Ekh7lseS8nhstHFUBVjKoisKe9DnC0k%3D</token>
</web-authentication>
3. Add the token to the Shopper Portal URL
Add the token to the Shopper Portal URL in the token parameter. Then, add any additional Shopper Portal Parameters. The examples below illustrate a few of the many possibilities for directing a shopper to their Shopper Portal.
Displaying a specific page of Shopper Portal
Set the desired page in pageToShow parameter (refer to Shopper Portal Parameters).
https://cp.bluesnap.com/jsp/entrance.jsp?target=cp&token=[authentication token]&pageToShow=[Control Panel page]Displaying the Shopper Portal for a specific subscription
Include the Subscription ID in the subscriptionId parameter. Notice that pageToShow value is change_cc.jsp; this lets the shopper change/update their credit card details for the specified subscription.
https://cp.bluesnap.com/jsp/entrance.jsp?target=cp&token=[authentication token]&pageToShow=change_cc.jsp&subscriptionId=[subscription id]Updated 3 months ago
