
Sage-Intacct
Connect AR Automation and Sage-Intacct to gain comprehensive invoicing with the option to add global payment processing, allowing you to:
- Embed Payment Link into invoices and templates so customers can easily pay.
- Enable customers to store their preferred payment methods for hassle-free payments.
- Charge invoices directly from your Sage-Intacct or AR Automation account.
- Configure Auto Payment rules to automatically charge invoices.
Connecting AR Automation and Sage-Intacct
Step 1: Connect AR Automation and Sage-Intacct
In your Sage-Intacct Account, you create a web-services-only user by following the steps below. This process syncs the data between your AR Automation and Sage-Intacct accounts.
1.1: Create User
- Go to Company > Admin > Web Services Users > Add.
- Complete the form.
Important
- Use
xmlgw-armaticas the User ID.- Ensure that you enter an email address that you have access to. The password for the account is sent to the specified email address.
- Click Save.
1.2: Choose Application/Module Permissions
For Intacct Single Entity Account
- Under User Application Subscriptions select the following subscriptions with the corresponding permissions:
- Company, select the Edit option for Attachments.
- Cash Management, select List and View for:
- Credit Card Accounts
- Checking Accounts
- Savings Accounts
- General Ledger, select List and View for:
- Accounts
- Statistical Accounts
- Accounts Receivable, select the following:
- Manage Payments: select List, View, Add, and Edit
- Customers: select List, View, Add, and Edit
- Invoices: select List, View, Add, Edit, and Post
- AR Account Labels: select List, View, and Add
- Order Entry, select the following:
- Order Entry Transactions: Select List, View, Add, and Edit.
- Order Entry Transaction Definitions: Select List, View, Add, and Edit.
- BlueSnap, select List, View, Add, Edit, Delete, Import and Templates for BlueSnapARQueue.
- Click Save.
For Intacct Multi Entity Account
- Go to Company > Admin > Roles > Add
- Create a Role specifying a name and description, if needed.
- Select the following subscriptions with the corresponding permissions:
- Company, select the Edit option for Attachments.
- Cash Management, select List and View for:
- Credit Card Accounts
- Checking Accounts
- Savings Accounts
- General Ledger, select List and View for:
- Accounts
- Statistical Accounts
- Accounts Receivable, select the following:
- Manage Payments: select List, View, Add, and Edit
- Customers: select List, View, Add, and Edit
- Invoices: select List, View, Add, Edit, and Post
- AR Account Labels: select List, View, and Add
- Order Entry, select the following:
- Order Entry Transactions: Select List, View, Add, and Edit.
- Order Entry Transaction Definitions: Select List, View, Add, and Edit.
- BlueSnap, select List, View, Add, Edit, Delete, Import and Templates for BlueSnapARQueue.
- Click Save.
- Assign the created Role to a Web Services User by navigating to Company > Web Services Users > Edit > Roles Information.
1.3: Enable Web Service Authentication
- In your Sage-Intacct account go to Company > Setup > Company > Security.
- Click Edit.
- In the Web Services authorizations section, click + to add a new web service.
- In the Web Services Sender Information screen, complete the following fields:
- Sender ID:
Pscore - Description:
Armatic Integration - Status: Active
- Sender ID:
- Click Save.
1.4: Connect Intacct in AR Automation
- In your AR Automation account, go to Account > Accounting.
- Click Connect under Intacct logo.
- Enter the Company ID, User ID (
xmlgw-armatic), and Password for this user. - Click Connect.
The pop-up window closes automatically and data begins syncing from your Sage-Intacct account to AR Automation. If your account has a large number of customers and/or invoices, the first sync takes longer.
Step 2: Embed payments and get enhanced data synchronization
Follow the steps below to take advantage of the expanded features and services available. You will have the ability to embed Payment Links in invoices and templates in Intacct, set up Auto Payment rules to automatically charge invoices, get enhanced data synchronization between your accounts, and more.
2.1: Download the BlueSnap module
- In your AR Automation account, go to Account > Accounting.
- Click Download BlueSnap Package.
- Extract the BlueSnap Zip file to your computer. The zip file contains:
- BlueSnap Package — Enables more efficient and comprehensive data exchanges with your Sage-Intacct account, including the ability to utilize your Sage-Intacct invoice PDF.
- BlueSnap Application — Adds payment processing to your Sage-Intacct account, enabling you to embed Payment Links in invoices and more. Your Sage-Intacct account must have Platform Services to install this package.
2.2: Install the BlueSnap Package file
- In your Sage-Intacct account, go to Platform Services > Custom Packages > Add.
- Click Choose File and select the saved BlueSnap Package file from your desktop.
- Notify your Implementation Specialist of which invoice template you would like to use: AR or Sales Invoice templates.
If your Sage-Intacct account has Platform Services, continue to the next step to install the second package, which will enable you to process payments directly from your Sage-Intacct account. If you do not have Platform Services, you will still have the ability to process payments - you will do so from your AR Automation account (please skip the next step).
2.3: Install the BlueSnap Application file (requires Platform Services)
In order to complete this step, please ensure your Sage-Intacct account has Platform Services before proceeding.
- In your Sage-Intacct account, go to Platform Services > Install Application > Add.
- Click Choose File and select the saved BlueSnap Application file from your desktop.
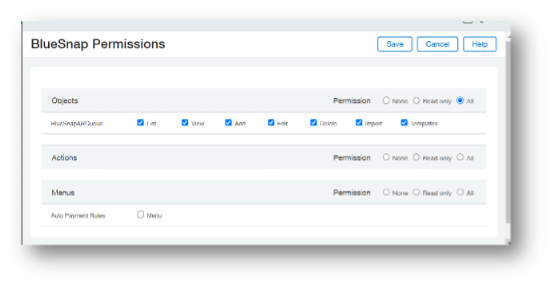
2.4: Add Permissions
You must add permissions in the BlueSnap module for all users (Roles) and/or Web Services Users that are creating invoices in your account. You can set permissions in the Roles settings.
- Navigate to Company > Admin > Roles.
- Select Web Services User Role or/and Roles for users that are creating invoices in your Intacct/AR account.
- Select the BlueSnap module with the corresponding permissions: List, View, Add, Edit, Delete, Import and Templates for BlueSnapARQueue.
2.5: (Optional) Set up Automatic Payment rules
Automatic Payment rules allow you to automatically charge new and updated invoices meeting a set of conditions that you define. If your Sage-Intacct account has Platform Services, follow the steps below. Otherwise, click here to learn how to set up Auto Payment rules in your AR Automation account.
- In your Sage-Intacct account, click the dropdown menu in the top-left of the screen and go to BlueSnap > Auto Payment Rules.
- Follow the steps here for adding an Auto Payment rule.
Passing Level 2 Data to AR Automation in Intacct
To pass Level 2 data to AR Automation in Intacct:
- Create a custom field on the AR invoice level: Refer to the Intacct Custom Fields Guide for detailed instructions on how to create custom fields in Intacct.
- Populate tax amount in the custom field: Once the custom field is created, ensure that the tax amount is populated in that field for each invoice.
Note
Level 3 data is not supported unless you are using unique Intacct Sender ID. By default, only Level 2 data is supported and should be included in the custom field created for AR Automation integration.
Intacct Synchronization Process
AR Automation provides automated accounts receivable software that integrates with accounting systems like Sage Intacct. Keep reading to learn more about the synchronization process between AR Automation and Intacct, including the initial synchronization, data synchronization, regular sync frequency, and handling of unsynchronized objects.
Initial Synchronization
Initial synchronization is the first time the integration between AR Automation and Sage Intacct is established, and data is transferred from one system to the other. During the initial sync, only data that has been created or modified in Intacct in the last 6 months is synchronized with AR Automation.
Data Synchronization
To optimize the synchronization process and reduce the number of API calls, we have implemented a data import method from Intacct using webhooks (smart events). Whenever a new object is created or an existing object is updated in Sage Intacct, a webhook notice is sent to AR Automation. This enables real-time updates in the AR software without the need for frequent syncs. For example, if you create or update a customer or invoice in Intacct, AR Automation receives a webhook and creates an object with the same data in the system.
Regular Sync Frequency
To minimize API calls and associated fees, the automated full account sync frequency has been set to once per day. This means that the system automatically performs a full account sync once every 24 hours. However, you can initiate a manual full account synchronization by clicking Sync Account. It's important to note that initiating a manual sync will increase the number of API calls used, which may result in additional API fees.
Unsynchronized Customers, Invoices, and Payments
If an object fails to sync during the initial synchronization attempt, the system does not automatically retry. If you encounter an unsynchronized customer, invoice, or payment, you must manually re-sync it to ensure it is updated in AR Automation and Intacct.
Syncing Payment Links, Pay Balance Links, and Next Auto Charge to Intacct
To sync customers' Payment Links, Pay Balance Links, and Next Auto Charge value to your Intacct account:
- Navigate to the Preferences page.
- Find the Accounting section.
- Check the box next to Sync Payment Link/Pay Balance Link/Next Auto Charge date to Accounting System in order to enable it.
Updated 8 months ago