
NetSuite Data Migration
When you switch to BlueSnap for your payment acceptance, you bring your existing client data, including their credit card and bank details, along with you. We work with your current provider to securely migrate your data, so you never have to handle it yourself. There's no need to recollect payment details and recreate records.
After we have imported the data into your BlueSnap account, you will receive two comma-separated value (CSV) files that contain the results of the import. No sensitive card data is contained in either file:
- Processed data file — Contains a record for each client that was successfully created in your BlueSnap account. The record includes the client ID and the last four digits of their card/account number. This is the file you will import into NetSuite using the CSV Imports tool.
- Discrepancy data file — Contains all client records that could not be imported. Each record include the client information and details on the error. Use this file to investigate the errors and determine if you want to fix and retry importing these records.
Create a Tokenized Payment Method in NetSuite
Before you can import your data, you must create a token that represents the payment method used for the records in your processed data file:
- Go to Setup > Accounting > Accounting List > New.
- In Name, enter the name for the new payment method. For example,
Credit Card Token. - From the Type dropdown list, choose one of the following:
- Payment Card Token to create a credit card token.
- General Token to create a token for a direct debit payment method, such as ACH or SEPA.
- If you selected Payment Card Token from the Type dropdown list, select the Requires Line-Level Data checkbox.
- Click Save.
For additional details about payment method tokenization, refer to the NetSuite documentation.
Import BlueSnap CSV Data into NetSuite
NetSuite provides the Import Assistant to guide you as you import CSV data.
Note
You must have the FULL access level on the Import CSV File permission to access the Import Assistant. For details, refer to the NetSuite documentation.
To use the Import Assistant, log in to NetSuite and go to Setup > Import/Export > Import CSV Files:
To import your BlueSnap processed data file, follow these steps:
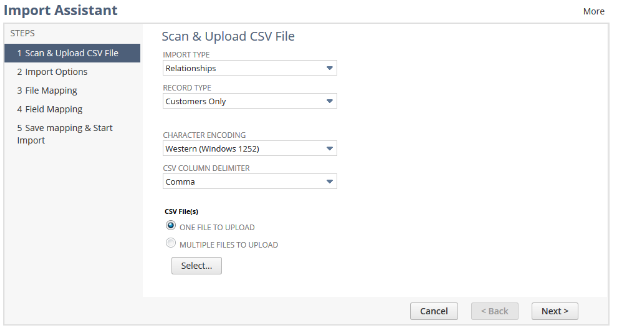
Step 1: Scan & Upload CSV File
On Scan & Upload CSV File, complete the following fields:
-
From the IMPORT TYPE dropdown list, select Payment Instruments.
-
From the RECORD TYPE dropdown list, select the type of record stored in your processed data file:
- For direct debit payment methods such as ACH or BECS, select General Token. General Token record files contain the following field headings and default settings:
- Customer: Customer name.
- Token Namespace: Must be identical to Token. See Token Namespace and Token Format.
- Token: Must be identical to Token Namespace. See Token Namespace and Token Format.
- Token Family: Value must be
BlueSnap. - Payment Method: Name of the tokenized payment method .
- For credit card records, select Payment Card Token. Payment Card Token record files contain the following field headings:
- Customer: Customer name.
- Last Four Digits: Last four digits of the credit card number.
- Card Brand: Company that issued the credit card.
- Token Namespace: Must be identical to Token. See Token Namespace and Token Format.
- Token: Must be identical to Token Namespace. See Token Namespace and Token Format.
- Token Family: Value must be
BlueSnap. - Payment Method: Name of the tokenized payment method .
Token Namespace and Token FormatEach supported payment type contains a Token Namespace and Token field that provide important details about the record's payment method. These fields must use the formats specified in the following table:
Important
The Token Namespace and Token values must be identical for each record.
Payment Method Format Example Credit Card CC;\<vaulted-shopper-id>;\<card-brand>;\<last-four-digits>CC;50852813;MASTERCARD;9903ACH ACH;\<vaulted-shopper-id>;\<acct-type>;\<routing-last-five>;\<acct-number-last-five-digits>ACH;50852813;CONSUMER_CHECKING;77665;44556BECS BECS;\<vaulted-shopper-id>;\<agreement-id>;\<bsb-number>;\<acct-last-four-digits>BECS;50852813;123;112233;6789PAD PAD;\<vaulted-shopper-id>;\<acct-type>;\<agreement-id>;\<routing-number>;\<acct-last-four-digits>PAD;52204989;PERSONAL;43211;001004820;0001SEPA SEPA;\<vaulted-shopper-id>;\<iban-first-four>;\<iban-last-four-digits>SEPA;50852813;1234;6789
- For direct debit payment methods such as ACH or BECS, select General Token. General Token record files contain the following field headings and default settings:
-
-
Select ONE FILE TO UPLOAD and click Select... to browse the file system for your processed data file. After you select the file, click Next.
Step 2: Import Options
On Import Options, choose one of the following Data Handling options to indicate how the imported data will impact your existing NetSuite data:
- Add: Use this option if all the imported records are new to NetSuite.
- Update: Use this option if all the imported records already exist in NetSuite, and the import will modify existing these records.
- Add or Update: Use this option if the imported records are a mixture of new and existing records. The existing records will be modified.
Click Next.
Step 3: File Mapping
On File Mapping, click Next to skip this step. File mapping is not required for this data migration.
Step 4: Field Mapping
On Field Mapping, you can see the automatic mappings of the CSV file fields to NetSuite fields:
- CSV file fields are listed on the left.
- Field mappings are displayed in the center.
- NetSuite fields are listed in the right pane.
You might need to manually map fields that the Import Assistant could not automatically map. The mapping status of each field is indicated as follows:
- Fields that need to be mapped are in darker text.
- Fields that have already been mapped are gray.
- Custom fields are marked with a special icon.
- Key fields are marked with a special icon.
- Required fields are marked with Req. You must map these fields or provide default values for them.
After you map all fields, click Next.
Step 5: Save mapping & Start Import
On Save mapping & Start Import, click Save & Run to import your BlueSnap CSV data.
Updated 8 months ago