
Post-purchase actions (email, licenses, downloads)
Learn about some important actions you may want to take after a shopper makes a purchase, such as sending an automated email to the shopper, or providing a license key or download link
Typical post-purchase activities include sending automated emails to the shopper based on templates that you customize, and providing license keys or download links. Learn more about how to configure each of these options:
Automated order emails
License key fulfillment
Download link fulfillment
Automated order emails
To send an automated email to the shopper after a purchase, simply set up an email template and apply it to the relevant contract. You can fully customize the template and include data like the customer name, purchase quantity, invoice link, and shipping address. Saved email templates can then be used across multiple contracts.
How
-
Go to Product Catalog > Products in the left menu of the Merchant Portal.
-
Expand the relevant product to view its contracts, and then click on the name of the contract where you want to set up the email.
-
In the top menu, click Order Email.

-
To use an existing template, choose it from the Select template menu and then click Submit.

-
To set up a different template, select either New or an existing template as the base. Then give the template a name and configure the settings below. Click Submit when you are done.
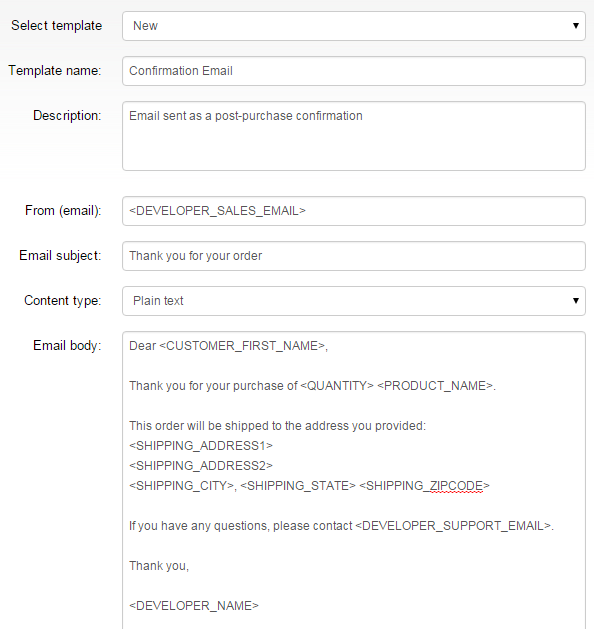
From (email)
The email address that will appear in the "From" field when the shopper receives the email. You can use any of these tags to dynamically insert one of your account's email addresses:
<DEVELOPER_SUPPORT_EMAIL>
<DEVELOPER_SALES_EMAIL>
<DEVELOPER_CONTACT_EMAIL>
<DEVELOPER_ADMIN_EMAIL>These tags map to the email addresses that you defined under Settings > General Settings.
Email subject
The subject line of the email.Content type
The email content type can either be HTML or plain text.Email body
The content of the email.You can use any of the tags on the right side of the page in order to dynamically insert information into the email. For example, if you want to include the customer's first name in the email, you would insert the
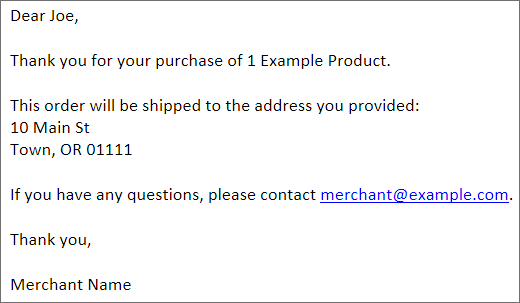
<CUSTOMER_FIRST_NAME>tag where you would like it to appear.See below for an example of an email template and what the actual email looks like based on this template.
If you are using the HTML content type, you must include the html tag
In order to send HTML emails, you must add the
<!DOCTYPE html>tag at the beginning of the email body and the</html>tag to the end of the email body.
For example:<!DOCTYPE html> <body> <p>Dear shopper...</p> </body> </html>
Sample template and output
Sample email template:
Dear <CUSTOMER_FIRST_NAME>,

Thank you for your purchase of <QUANTITY> <PRODUCT_NAME>.

This order will be shipped to the address you provided:
<SHIPPING_ADDRESS1>
<SHIPPING_CITY>, <SHIPPING_STATE> <SHIPPING_ZIPCODE>

If you have any questions, please contact <DEVELOPER_SUPPORT_EMAIL>.

Thank you,

<DEVELOPER_NAME>
Sample email output from this template:
License key fulfillment
You can automatically provide license keys to shoppers through BlueSnap using one of our two license distribution methods:
-
Uploaded list of keys: If you have pre-generated license keys, you can upload your list of license keys to your BlueSnap account and then enable automatic delivery of a license key per order or item. See Setting up a list of keys.
-
Custom HTTP Request: If you host your own key generator, you can create license keys by referencing your custom key generator. See Setting up a custom HTTP request.
License keys are delivered by email
Regardless of which option you choose to distribute license keys, the keys are delivered to the shopper by email. This is separate from any other automated email that you configure.
Setting up a list of keys
To use an uploaded list of keys, there are two steps: creating the list of keys and then associating the list with a specific contract.
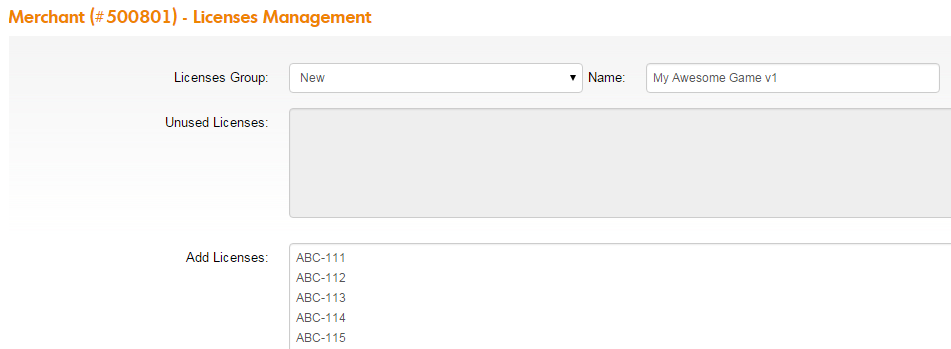
1. Creating a list (group) of license keys
-
Go to Product Catalog > Licenses in the left menu of the Merchant Portal.
-
In the Licenses Group menu, select New, and then enter a name for this new group of licenses.
-
In the Add Licenses field, paste your list of license keys.
-
Click Submit.
2. Connecting a license group with a specific contract
-
Go to Product Catalog > Products in the left menu of the Merchant Portal.
-
Expand the relevant product to view its contracts, and then click on the name of the contract where you want to connect the licenses.
-
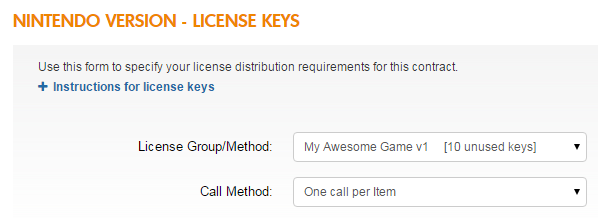
In the top menu, click License Keys.

-
From the License Group/Method menu, choose the license group to associate with this contract (each license group can be connected to multiple contracts).
-
From the Call Method menu, select one of these options to determine how the licenses will be distributed:
- One call per item: A separate license key will be issued for each item in the order, so if the order quantity is 5, then 5 license keys will be sent.
- One call per order: Only one license key will be sent per order, regardless of the quantity purchased.
-
Click Submit.
Setting up a custom HTTP request
If you have your own license key generator, you can connect to it by setting up a custom HTTP request, as follows:
-
Go to Product Catalog > Products in the left menu of the Merchant Portal.
-
Expand the relevant product to view its contracts, and then click on the name of the contract where you want to connect the licenses.
-
In the top menu, click License Keys.
-
From the License Group/Method menu, choose Custom HTTP Request.
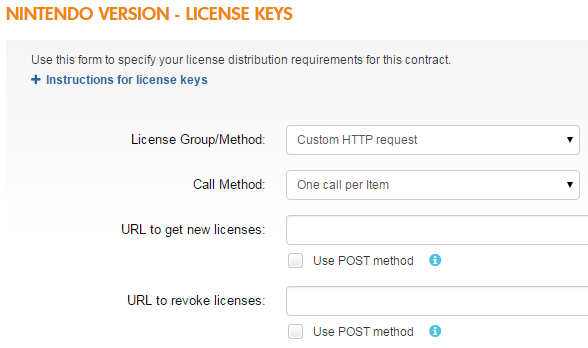
-
From the Call Method menu, select one of these options to determine how the licenses will be distributed:
- One call per item: A separate license key will be issued for each item in the order, so if the order quantity is 5, then 5 license keys will be sent.
- One call per order: Only one license key will be sent per order, regardless of the quantity purchased.
-
Enter the URL of your key generator to get new licenses.
-
Enter the URL of your key generator to revoke licenses.
-
Click Submit.
Download link fulfillment
If you need to provide shoppers with a download link, you can do this by uploading the file to BlueSnap and then automatically sending the download link to the shopper by including it in your email template.
-
Go to Product Catalog > Products in the left menu of the Merchant Portal.
-
Expand the relevant product to view its contracts, and then click on the name of the contract where you want to set up the download link.
-
In the top menu, click Related Files/URLs > Paid Version.

-
Upload your file using one of the upload options.
-
Configure the order email for this contract and make sure to include the
<PRODUCT_DOWNLOAD_URL>tag in the email template. See Automated emails.
Updated 8 months ago