
Hosted Pages
BlueSnap Checkout Hosted Pages gives you a pre-built, hosted checkout page so you can start processing solutions quickly with BlueSnap's global payment network.
BlueSnap Checkout Hosted Pages requires that you create post-checkout pages and develop business logic to generate a JSON Web Token (JWT) for each transaction. You can either store the shopper's payment information with the JWT for future transactions, or immediately redirect the shopper to your hosted checkout page which automatically loads the transaction details from the JWT.
We also provide optional features, such as an embedded iframe and workflows that simplify the checkout experience for returning shoppers.
Before you Begin
Before you can implement BlueSnap Checkout, complete the following:
- Create your API credentials.
- Assign a static IP address to your web server.
- Select a sandbox or production environment.
- Satisfy the Website Requirements.
- (Optional) Generate a secure signing key if desired.
Website Requirements
Your website should include the checkout page and two post-checkout landing pages: one for successful transactions, and one for canceled transactions. This list describes each of the required pages:
- Checkout page — Secure, hosted BlueSnap Checkout page that you can customize to match your brand. Go to BlueSnap Checkout > Checkout Settings in the Merchant Portal to select theme, display, and custom field options for your checkout form. For additional details, refer to Page Design and Custom Fields.
- Success page — Post-checkout landing page that notifies your shopper that the transaction succeeded. For example, this page might summarize the payment and shipping information. After you develop this page, log in to the Merchant Portal and go to BlueSnap Checkout > Checkout Settings and enter its URL in Success URL.
- Cancel page — Post-checkout landing page that confirms that the transaction was canceled and no funds will be transferred from your shopper's account. After you develop this page, log in to the Merchant Portal and go to BlueSnap Checkout > Checkout Settings and enter its URL in Cancel URL.
Optional: Generate a Signing Key
The signing key is a shared secret between the merchant and BlueSnap that provides an additional layer of security during checkout.
- Go to Settings > API Settings in the top menu of the BlueSnap Merchant Console.
- In the BlueSnap Checkout Signing Key section, click Generate Signing Key.
- Store this key securely, as it will only be shown once. You will provide the encrypted hash as the
signatureReturn URL parameter in Step 3: Redirect to Checkout.
If needed, you may return to these settings and click Regenerate Signing Key to create a new one. This will replace your existing key and any integrations using the previous key will stop working until they are updated with the new one.
Implementing Hosted Pages
These steps implement BlueSnap Checkout so you can collect shopper payment information on your website and securely process transactions with BlueSnap.
Step 1: Add the BlueSnap Web SDK
The BlueSnap Web SDK is a Javascript bundle that provides application code for BlueSnap Checkout. You need to add this bundle to your web page with an HTML script element.
BlueSnap provides a unique Javascript file for the sandbox and production environments so you can test your implementation before processing live transactions. Below are sample HTML script elements for each environment:
<script type="text/javascript" src="sandpay.bluesnap.com/web-sdk/5/bluesnap.js"></script><script type="text/javascript" src="pay.bluesnap.com/web-sdk/5/bluesnap.js"></script>Step 2: Create a JWT Token
BlueSnap Checkout processes each transaction with a JWT token. Processing with a JWT provides the following benefits:
- Securely stores transaction data
- Allows BlueSnap to verify your identity
- Prevents unauthorized websites from creating BlueSnap checkout pages on your behalf
To capture the shopper's payment information, you must create a JWT that contains the transaction details:
-
Send a request for the JWT from your client-side application to its web server.
-
From your web server, send a server-to-server request to the JWT endpoint in your chosen BlueSnap environment. The request should include BlueSnap secure payment parameters that provide details about the transaction. Refer to Secure Payment Parameters for more details about these requirements.
Note
The JWT must be less than or equal to 4500 bytes. If it exceeds this limit, you must shorten your product names or descriptions sent in the request.
The following examples request a JWT for a one-time transaction, creating a shopper (to store payment information for future use instead of proceeding with an immediate transaction), and a subscription. Replace the Authorization header value
YOUR_API_KEYwith your API credentials:
curl -v -X POST https://sandbox.bluesnap.com/services/2/bn3-services/jwt \
     -H 'Content-Type: application/json' \
     -H 'Accept: application/json' \
     -H 'Authorization: Basic YOUR_API_KEY' \
     -d '
     {
       "mode": "one_time",
       "onBehalf": "false",
       "currency": "USD",
       "successUrl": "http://www.example.com/success",
       "cancelUrl": "http://www.example.com/cancel",
       "merchantTransactionId": "myid1234",
       "lineItems": [
         {
           "id": "001",
           "quantity": 2,
           "label": "T-Shirt",
           "description": "T-Shirt with logo",
           "amount": 20
         },
         {
           "id": "002",
           "quantity": 1,
           "label": "Shorts",
           "description": "Green shorts with pockets",
           "amount": 15
         }
       ]
     }'
curl -v -X POST https://sandbox.bluesnap.com/services/2/bn3-services/jwt \
-H 'Content-Type: application/json' \
-H 'Accept: application/json' \
-H 'Authorization: Basic YOUR_API_KEY' \
-d '
{
"mode": "create_shopper",
"successUrl": "http://www.example.com/success",
"cancelUrl": "http://www.example.com/cancel"
}'curl -v -X POST https://sandbox.bluesnap.com/services/2/bn3-services/jwt \
-H 'Content-Type: application/json' \
-H 'Accept: application/json' \
-H 'Authorization: Basic YOUR_API_KEY' \
-d '
{
"mode": "subscription",
"successUrl": "http://www.example.com/success",
"cancelUrl": "http://www.example.com/cancel",
"planItems": [
{
"id": "001", // the plan id from createPlan API
"quantity": 1,
"label": "AAA subscription", // override the plan-name
"recurringChargeAmount": 20, // override the recurringChargeAmount
"trialPeriodDays": 14, // override the trialPeriodDays
"initialChargeAmount": 10 // override the initialChargeAmount
}
]
}'Note
The
successUrlandcancelUrlrequest parameters are only required if not configured in your page design settings. If they are both configured there and provided in this API request, the API request will override the Success URL and Cancel URL settings in your Merchant portal.
A successful request returns a response that includes your token in the jwt property:
{
  "jwt": "eyJhbGciOiJIUzI1NiJ9.eyJwYXlsb2FkIjp7ImNvbW1vbkp3dFBheWxvYWQiOnsiaWQiOiI1OTU4NTkxODYxNTgwMDg5OTI3NzEiLCJtZXJjaGFudElkIjo0MDAwNDgsImRhdGVDcmVhdGVkIjoxNjA2OTk2MjI5OTExLCJlbnYiOiJERVY2In0sImN1cnJlbmN5IjoiVVNEIiwic3VjY2Vzc1VybCI6Imh0dHBzOi8vaG9tZS5ibHVlc25hcC5jb20iLCJjYW5jZWxVcmwiOiJodHRwczovL2FwLmJsdWVzbmFwLmludDo0MDA0L2NhbmNlbCIsIm1lcmNoYW50VHJhbnNhY3Rpb25JZCI6IjU5NTg1OTE4NjE1ODAwODk5Mjc3MSIsImxpbmVJdGVtcyI6W3siaWQiOiJpZDEiLCJsYWJlbCI6IlJhaW5ib3ciLCJkZXNjcmlwdGlvbiI6IlRvdWNoIHRoZSBSYWluYm93IiwicXVhbnRpdHkiOjEsImFtb3VudCI6MTAuMCwiaW1nVXJsIjpudWxsfV19fQ.Mi4eiNKCsGDTsLHnTXPfe4-UNpQYSY-OvKufwZr2jR0",
  "merchantTransactionId": "myid1234"
}
For details about this response object, refer to Create Token API.
Token Expiration
The BlueSnap JWT token expires if either of the following are true:
- The default two hour expiration period for a transaction has elapsed
- You successfully processed a transaction with the token
If the default expiration period is not sufficient, you can set a custom expiration period with the expH payment parameter. This parameter accepts an integer that specifies the number of hours that the JWT expires after you create it. For example, "exph": 10 means that the JWT expires 10 hours after it is created. This property accepts up to 8,760 hours (one year). Setting a custom token expiration period requires special privileges. If you cannot successfully send expH in a token request, speak with your implementation manager or contact merchant support.
The following request snippet creates a JWT token that expires after 10 hours:
curl -v -X POST https://sandbox.bluesnap.com/services/2/bn3-services/jwt \
     -H 'Content-Type: application/json' \
     -H 'Accept: application/json' \
     -H 'Authorization: Basic YOUR_API_KEY' \
     -d '
     {
          "mode": "one_time",
          "expH": 10,
          ...
     }'
Step 3: Redirect to Checkout
Note
Some payment methods require additional implementation after this step. For details, refer to Adding Payment Methods.
Now, you have a JWT on your server that contains your shopper's information. To complete a transaction, your client-side application must retrieve the JWT from your server, then pass the token to the BlueSnap Web SDK. The Web SDK initializes BlueSnap Checkout page with the token information and then redirects your shopper to the page to complete the checkout process.
The following code sample demonstrates how you can implement this process. It registers an event handler to a payment button that a shopper clicks to continue to checkout. When the shopper clicks the button, the event fires and performs the following steps:
- Retrieves the token from your server and parses the response as JSON.
- Extracts the token from the parsed JSON and stores it in an sdkRequest object.
- Stores the token in an
sdkRequestobject. - Passes the
sdkRequestobject to the Web SDKbluesnap.redirectToPaymentPagefunction. This function expects ansdkRequestobject containing a JWT so it can initialize the BlueSnap Checkout page and redirect the shopper to complete the transaction. ThissdkRequestcan optionally include Level 2/3 data.
document.getElementById('payButton').addEventListener('click', function () {
  // 1. Retrieve token from server
  fetch('https://your-server.com/path/to/token')
    .then((response) => response.json())
    .then((data) => {
      // 2. Extract token from response
      const token = data.token;
      // 3. Store token in sdkRequest object
      const sdkRequest = {
        jwt: token
      };
      // 4. Pass sdkRequest object to Web SDK
      bluesnap.redirectToPaymentPage(sdkRequest);
    })
    .catch((error) => {
      console.log(error);
    });
});
When your shopper completes the checkout process, BlueSnap redirects the shopper to either the successUrl or cancelUrl stored in the JWT depending on the transaction outcome. If the shopper completes the transaction, BlueSnap appends transaction data to the successUrl with Return URL Parameters.
Step 4: Verify your Transaction
To ensure transactions are valid, we recommend that you compare and validate your transaction details against existing information. You can retrieve transaction details from the URL parameters appended to your successUrl.
There are two ways to verify a transaction:
-
Send a Retrieve API request to get transaction details and confirm that the transaction succeeded. Because BlueSnap operates in two different data centers, you need to request the transaction from the data center that processed the transaction.
To determine which data center processed the transaction, use the BlueSnap
transactionIdproperty that was appended to thesuccessUrl. The last digit in the invoice ID indicates the data center:transactionId Call Domain Odd number ws2.bluesnap.comEven number ws1.bluesnap.com -
Set up webhooks to receive an alert for any event, including a charge.
Payment Method Requirements
Note
If you want to accept Apple Pay, contact Merchant Support to enable it on your account.
Some payment methods require that you display specific information on your successUrl page. To gather additional information about the transaction, extract the transactionId from the return URL parameters and then use the Payment API to send a GET request for that payment method to retrieve the relevant transaction details.
SEPA Direct Debit
SEPA Direct Debit transactions require that you display the mandate ID and mandate date on your successUrl confirmation page. In addition, you must send a pre-notification email to the shopper to inform them that funds will be debited from their account for the transaction.
To complete implementation for SEPA Direct Debit:
- Get the
transactionIdfrom the return URL parameters. - Send the
transactionIdin a GET request to retrieve details about the SEPA Direct Debit transaction. - Use the transaction information in the response to add the mandate ID, mandate date, and create a pre-notification email for the transaction. For comprehensive details about the requirements, refer to Step 3 in Implement SEPA Direct Debit.
Level 2/3 Data
You can include Level 2/3 Data in the sdkRequest to pass enhanced transaction information to the BlueSnap Checkout page. To do so, provide a displayData.level3Data object with order and item-level properties:
bluesnap.redirectToPaymentPage({
    jwt: '<token>',
    displayData: {
        level3Data: {
            customerReferenceNumber: 'string',
            salesTaxAmount: decimal,
            // additional order-level properties
            level3DataItems: [{
                // item-level properties for up to a maximum of 97 items
            }]
        }
    }
});
L2 Properties
The below order-level fields must be provided to qualify for the minimum L2 data.
| Property | Mandatory | Description |
|---|---|---|
customerReferenceNumber | Yes | Reference number used by the customer to track an order. |
salesTaxAmount | Yes | The total sales tax amount. |
L3 Properties
The following order-level and item-level L3 data may also be provided, depending on which are supported by the transaction's credit card type. Refer to the Mastercard, Visa, and Amex definitions for more information and plug them into the above template where indicated.
Order-level properties:
freightAmount,dutyAmount,discountAmount,taxAmount,taxRate,shipFromZipCode,destinationZipCode,destinationCountryCode
Item-level properties:
description,productCode,commodityCode,itemQuantity,unitCost,lineItemTotal,taxAmount,taxRate(required iftaxAmountis provided),taxType,unitOfMeasure,discountAmount,discountIndicator,grossNetIndicator
Embed in an iframe
You can configure BlueSnap Checkout to open within an iframe, an HTML element that embeds an HTML page within an HTML page. Embedding an iframe means that you do not have to redirect your shopper to a different URL during checkout.
To embed the BlueSnap Checkout iframe, add the following <div> element to your page:
<div data-bluesnap="iframe-container"></div>Controlling Redirection
In some cases, you might want to control which browsing context is redirected to your successUrl or cancelUrl: the iframe or the web page that contains the iframe.
By default, redirection occurs only within the iframe. You can configure this behavior with the displayData.iframeOptions.topRedirect property of the sdkRequest object. When set to true, BlueSnap Checkout redirects the entire page to the successUrl or cancelUrl. When omitted or explicitly set to false, only the iframe window is redirected.
Note
PayPal always performs top redirection and ignores the
topRedirectsetting.
Returning Shoppers
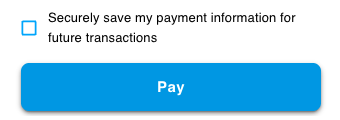
Checkout pages commonly offer shoppers the option to store their checkout information for convenience when they return for future purchases. BlueSnap Checkout lets you give your shopper the option to save their payment information with the store card checkbox. In addition, BlueSnap securely stores this payment information for you so you do not need to worry about implementing additional security measures.
Enable Store Card Checkbox
The store card checkbox lets the shopper grant permission to store their payment information for future transactions. You can enable it from the Merchant Portal:
- Log into the Merchant Portal and go to BlueSnap Checkout > Checkout Settings.
- Toggle the Store Card Checkbox switch to the right.
The checkbox displays directly above the Pay button on your BlueSnap Checkout page:
Populating Payment Information
BlueSnap securely stores your shopper information and assigns it a vaultedShopperId. You can retrieve the vaultedShopperId and include it in the JWT to populate payment information for future purchases.
To retrieve the vaultedShopperId, extract the transactionId from the return URL, and send it in a Payment API GET request for the transaction type. For example, if the shopper paid with a credit card, send the transactionId in a Retrieve API request. The response object includes the vaultedShopperId.
Now, you need to include the vaultedShopperId in all future JWTs that you create for your shopper. The Create Token API lets you pass the vaultedShopperId as the shopperId property. Here is a truncated example:
curl -v -X POST https://sandbox.bluesnap.com/services/2/bn3-services/jwt \
     -H 'Content-Type: application/json' \
     -H 'Accept: application/json' \
     -H 'Authorization: Basic YOUR_API_KEY' \
     -d '
     {
       ...
       "shopperId": 12345678,
       ...
     }'
When you pass the returned JWT to the BlueSnap Web SDK, your shopper's payment information is automatically loaded when the BlueSnap Checkout page initializes.
Updated 3 months ago