EventsAIR Setup
Learn how to connect EventsAIR and BlueSnap for a unified event management and global payment processing solution.

EventsAIR provides an all-inclusive event management platform for events of all types and sizes. By integrating EventsAIR and BlueSnap, planners can create an online registration form, conveniently hosted on EventsAIR, where attendees can select events and securely submit their payment to be processed by BlueSnap.
Supported Features
Auth/Capture and Separate Auth and Capture
Built-in Fraud Prevention and Risk Management
Chargeback Management
Credit and Debit Card Processing
Hosted Payment Fields
Multiple Currencies and Multiple Languages
Partner Sandbox Testing
Payment Analytics and Reporting
Payment Optimization
Vaulted Shoppers
Requirements
EventsAIR Software
This guide assumes you have the EventsAIR software. If you need to get started, go to the EventsAIR website.
BlueSnap Account
You must have a BlueSnap account. If you need one, go to the BlueSnap website to get started.
Supported Currencies
BlueSnap supports the currencies listed here. We recommend configuring your store to only accept currencies supported by BlueSnap.
Supported Countries
BlueSnap supports the countries listed here. If a shopper is located in one of these supported countries, they will be able to purchase with the BlueSnap payment module.
EventsAIR Setup
Step 1: Configure your BlueSnap account settings
Complete these steps in your Merchant Portal for production or sandbox.
-
Get your BlueSnap API credentials and define the authorized IP addresses for your server. Both of these actions are performed on the same page. For instructions, refer to API Credentials.
-
Set up your statement descriptor. The statement descriptor is the description that appears on the shopper's credit card statement or bank statement for each transaction and helps the shopper identify the transaction.
- Go to Settings > General Settings.
- In the Branding Settings section, enter a Default Statement (Soft) Descriptor and Support Phone Number (both appear on the shopper's statement).
- Click Submit.
-
To get paid, you need to configure your payout settings. Refer to Payout for more information.
Step 2: Configure your EventsAIR settings
Follow the steps below to configure BlueSnap as your payment gateway in your EventsAIR account.
-
At the EventsAIR start screen, click Application Setup. If this screen isn’t visible, you need an Admin account to continue.
-
Under System Setup, open External Connections.
-
Select the E-Commerce Gateway Setup option by clicking the plus icon.
-
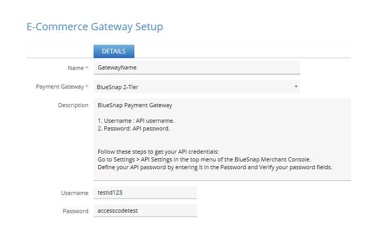
Configure the following settings:
- Name — Enter a name for the BlueSnap gateway record (i.e., "BlueSnap Production").
- Payment Gateway — Select BlueSnap.
- User Key — Enter your BlueSnap API user key for production (or sandbox for testing purposes).
- Password — Enter your BlueSnap API password for production (or sandbox for testing purposes).

Best Practices & Tips
Considering shopper impact of currency conversions
While transactions are placed in your store’s base currency, you might have your store configured to display product prices in multiple currencies. To account for any differences between the currency conversion rates used to display prices on your website and the rates used by the shopper’s issuing bank, we recommend including a note on your checkout page that informs shoppers of potential price variations. For example: “The price listed is approximate and may vary slightly”.
Reporting
Use BlueSnap's reporting capabilities to gain a comprehensive understanding of your business through detailed transaction and payout reports, payment conversion reports, and much more. Reports can be viewed right in your Merchant Portal or pulled using the Reporting API to be parsed or pushed to your third-party reporting tools.
Updated 3 months ago
