
Create and Assign Cadences
Create a Cadence
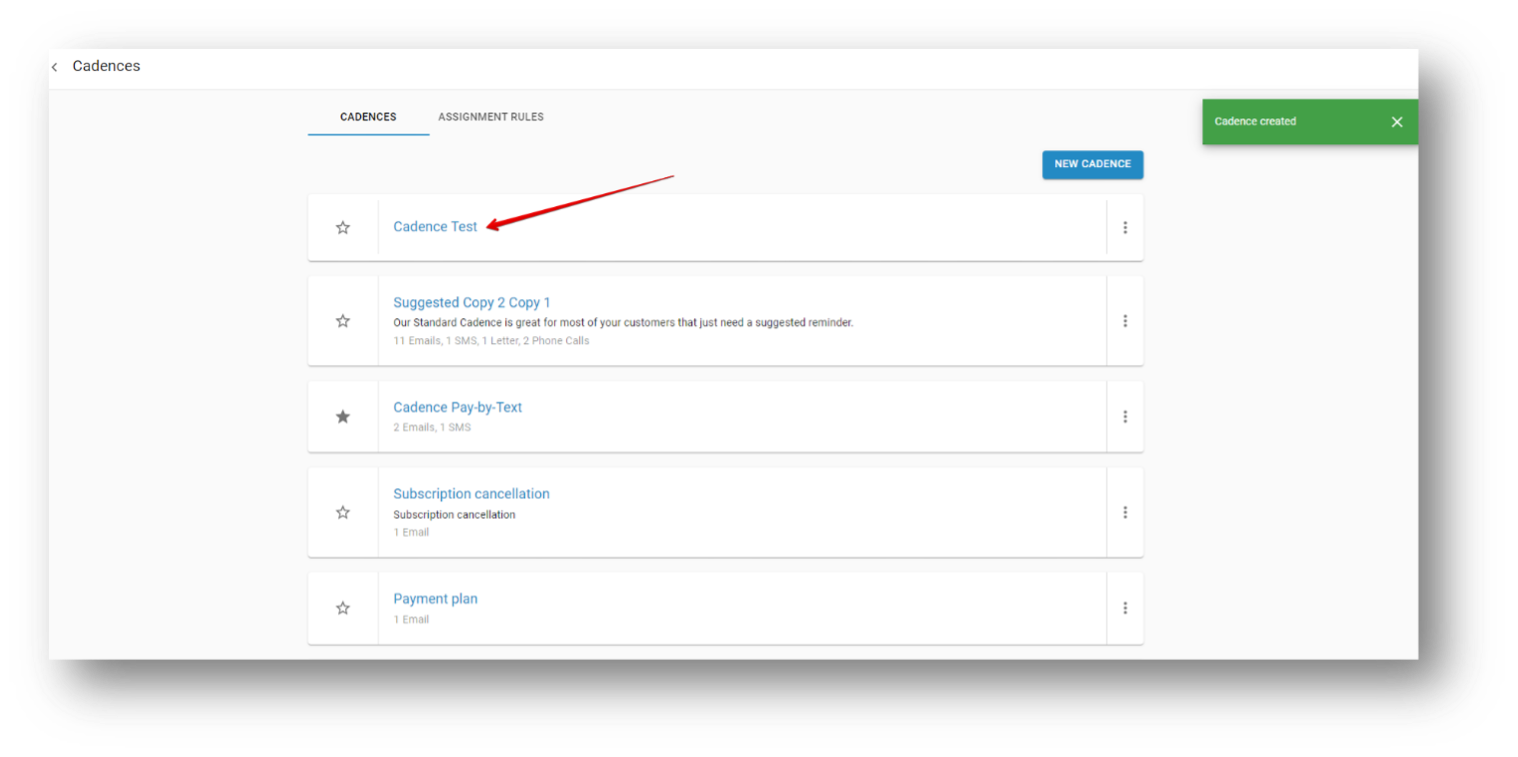
- On the Settings screen, click Cadences.
All existing cadences (including default cadences) are available on this screen. - On the Cadences screen, click New Cadence in the top-right of the screen.
- Enter the Name and Description of the cadence.
- Click the name of the cadence you just created.
Adding Cadence Steps
Cadence conditions allow you to specify the criteria that must be met before an action takes place within a cadence.
- On the New Step screen, enter the Condition, which acts as the trigger for the rule.
Conditions can be based on customer, invoice, payment statuses, or a point in time. Some of the most frequently used conditions trigger communication when an invoice is created, when an invoice is past due, when a payment is made/declined, and sending statements on a specific day of the month. - Select the type of communication to be created. Communication options are:
- Email — Sends an email to the customer. Emails are sent from the connected email accounts, based on the Billing Team Email settings.
- SMS — Sends an SMS message to the phone number listed for the customer. Depending on your AR Automation plan, the phone number can be customized and a set number of SMS messages may be included each month. Additional SMS message charges are deducted from your balance. You can choose your plan and view/reload your balance under Account > Billing.
- Letter — The system can print, stamp, and mail documents including collection notices and invoices statements. All letters are printed double-sided and include a return envelope with a tear-off return slip. The cost of printing letters is deducted from your balance.
- Phone call — In a cadence, a Phone call is a reminder (displayed in the To-Do List) to call the customer.
- Internal reminder — This option lets you send an email to any email address. This is especially useful for sending inter-company notifications regarding the status of a customer or invoice.
- Click Add to save the step.

Cadence Step Settings
- On the right side of the screen, complete the cadence step settings. The availability of settings depends on the type of condition and communication channel.
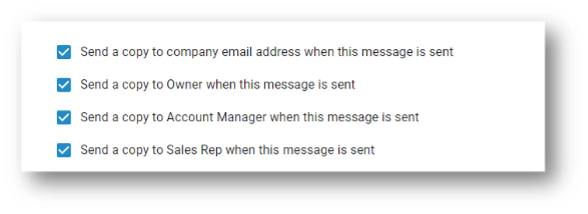
- Send a copy to other team members:
This setting allows you to send a copy of the communication to other team members or email accounts. It is available for Email or Internal Reminder steps.- If you select Copy to company email the email address listed as the Accounting Email under Company Profile will receive a copy of the communication.
- Alternatively, you can choose to copy the Owner, Sales Rep, or Account Manager and send an email to the user the customer has listed for the respective role.
- Send automatically: Every step has the option to be sent automatically.
- If you select Send automatically, as soon as the condition is met that step in the cadence is sent in the next delivery window. (Delivery windows are configured in the email settings.)
- If you do not select this option, this step must be approved manually. Steps that require approval appear as Pending in the To-Do list.
- Attach invoice PDF: For Email and Letter steps, there is an option to Attach invoice PDF. If you select this option, a PDF of the invoice is attached to the email or, for letters, the invoice PDF is printed on the back of the first page.
- Attach invoice attachments: This is only available for email steps. If a file is attached to an invoice, the attached file is sent as an attachment to the email. To attach a file to an invoice, click the invoice number and scroll down to the Document section of the invoice, and select Attach New Document.
- Include one-off invoices and Include recurring invoices: This setting allows you to include recurring invoices, one-off invoices, or both in your communications. Typically, you should keep both of these options selected. If you do not select both, you create steps that only occur for subscription invoices or only occur for non-subscription invoices.
- Recurring Invoices are invoices created by the AR Subscription Module.
- One-off Invoices are invoices created manually or imported from your accounting system or CSV file.
- Timing: Most conditions have the option to choose the number of days before or after an event to trigger the step. For example, you can create a step to send a past due notice 5, 15, and 45 days after an invoice is past due. You can enter up to three digits in this field.
Note that in the cadence timing setting, 0 days is considered to be the first day. So if you set a cadence to trigger on the same day as the event, make sure to enter "0" in the timing field to ensure the communication is sent on the first day. - Settings for Statements Conditions: Statements have some unique settings because they are generated at the customer level. Statements can be sent by email (as an attachment) or as a letter.
- Don't send this statement if customer's balance is cleared: If enabled, system does not send a statement to customers assigned to the cadence if the customer does not have a balance.
- Don't send this statement if invoice balance is cleared
- Exclude or Only Include invoices created in the last__ days: This option excludes invoices created outside the number of days selected, or only includes invoices created within a specific number of days.
Adding Cadence Step Content
- After creating a cadence and selecting the desired communication channel, navigate to the right side of the screen. Here, you can add content for your cadence step.
- For email communication, first, enter the Subject of the email. You can then add the content for the email below the subject line.
- Use the editor to customize the appearance of the communication or switch to HTML mode from the editor menu at the top.
- Preview the communication to understand how the end-customer is presented with the information and click Save in the top-right of the screen.
Placeholders
To personalize the content with information specific to the customer, balance, invoice, etc., use a Placeholder. To access the placeholder list, select the + icon in the editor menu.
The availability of specific placeholders depends on the condition. You can use placeholders to fulfill contacts, invoices’, and company information or use Call-to-Action placeholders.
Call-to-Action Placeholders
Call-to-Action options: A call-to-action lets you direct your customers to take a specific action (such as "Pay your invoice", "Pay your balance" or "update the payment method on file") directly from the communication. To add a call to action, click the + icon to access the placeholder menu, and then select the call to action.
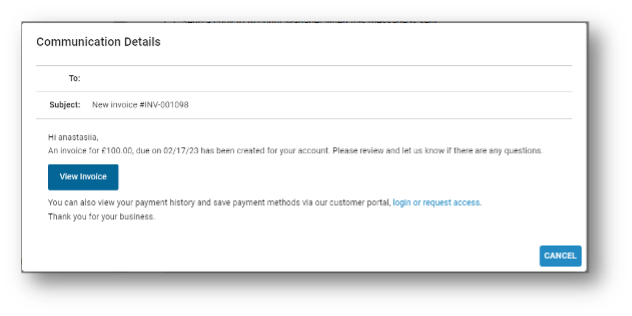
- Invoice Button: Directs customers to an online version of the invoice that triggered the reminder. Integrated payment options are available to accept payment for this invoice. Payment options are configured in Preferences > Payments.
- Pay Balance Button: Directs customers to a summary of open invoices with the ability to make a payment for all invoices at once or individually.
- Update Billing Info Button: Directs customers to update the payment method they have on file. This can be especially useful for failed automatic payments.
- Customer Portal Button: Directs customers to log in to their customer portal. Customers who have previously been invited to the portal can log in with the password they created. Customers who have not been previously invited need to Request Access and enter the email address on file.
Once you've customized your cadences, the next step is to assign these rules to your customers and invoices. Cadences can be automatically assigned through Cadence Assignment rules or they can be manually assigned at the customer level, which then applies to all invoices for that customer, or to a specific invoice.
Manually Assign a Cadence
To manually assign a cadence to a customer or invoice:
- Click the Actions menu (⁝) to the right of the Customer or Invoice object.
- Click Select Cadence. If a cadence has already been assigned, select Change Cadence.
- Select the cadence you want to assign and click Save.
- Batch Actions can also be used to assign cadences, remove cadences, invite customers to their portal, or change owners to multiple objects at once. To use batch actions:
- Select the customers or invoices using the checkmark on the left.
- Select Batch Actions in the upper left.
- Select the action.
QR Code Placeholders
For users who opt for physical letters for communication, an easy way to navigate to AR Automation Payment Links and our Customer Portal login page is by using our QR Code Placeholders. For each physical letter, we generate a unique QR code for each customer’s Payment Link, Pay Balance Link, Payment Method Link, and Customer Portal Link.
When your customer receives a letter with a QR code, they just need to scan the QR Code on the letter using their smartphone and they will be redirected to the corresponding linked page.
You can find a complete list of QR codes and what they are linked to below:
- Placeholder Pay Balance QR Code is linked to the customer's Pay Balance Link.
- Placeholder Customer Portal QR Code is linked to the Customer Portal login page.
- Placeholder Payment Link QR Code is linked to the customer's Payment Link.
- Placeholder Update Billing Info QR Code is linked to the customer's Payment Method Link.
Find more detailed information about ways to accept payments and descriptions of each payment link here.

Default Cadence
When a default cadence is set, it is automatically applied to all new customers. This eliminates the need to manually assign a cadence to each new customer. To set a default cadence, click the star icon next to the cadence. A solid star indicates that the cadence is the default cadence. To change the default cadence, click the star icon on another cadence.

Best Practice
When you first assign steps in your cadence, do not use the Send this reminder automatically option.
When a step in a cadence is not set to send automatically, it generates tasks that can be reviewed and approved. This gives you the opportunity to verify that all content and conditions are correct. When everything is correct, edit the cadence to send any step(s) automatically.
Updated 8 months ago