Single Sign-On with an IdP
BlueSnap's support for single sign-on (SSO) lets users sign into their BlueSnap accounts with one set of credentials, removing the hassle out of logging in. BlueSnap supports Security Assertion Markup Language (SAML), enabling you to go through your preferred Identity Provider (IdP) to authenticate with BlueSnap. Login security is greatly improved since users don't need to create and store another password, and since you can utilize password policies and two-factor authentication configured through the IdP.
Note
If you'd like to set up SSO with an IdP not covered on this page, please work with your Implementation Specialist or contact Merchant Support.
SSO Setup with Okta — Classic UI
Follow the steps below to authenticate with BlueSnap using Okta's Classic UI.
Requirements
You must have an Okta account and your app must be authenticated with Okta before proceeding.
-
Log in to your Okta account (Classic UI view).
-
Go to Applications > Applications and click Add Application.
-
Click Create New App.
-
Select Web as the Platform and SAML 2.0 as the Sign on method.
-
Click Create.
-
Enter a name for the app, such as BlueSnap. Leave the remaining fields as they are and click Next.
-
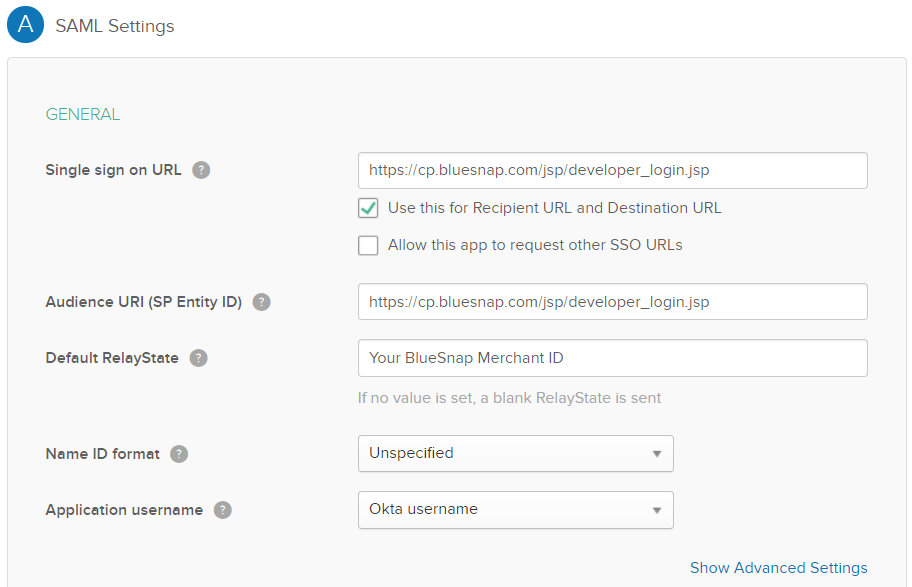
Configure the following settings.
| Setting | Description |
|---|---|
| Single sign on URL | BlueSnap Production: https://cp.bluesnap.com/jsp/developer_login.jsp BlueSnap Sandbox: https://sandbox.bluesnap.com/jsp/developer_login.jsp |
| Use this for Recipient URL and Destination URL | Select this checkbox. |
| Audience URI (SP Entity ID) | BlueSnap Production: https://cp.bluesnap.com/jsp/developer_login.jsp BlueSnap Sandbox:
|
| Default Relay State | Enter your BlueSnap Merchant ID. |

-
Click Next.
-
Select I'm a software vendor. I'd like to integrate my app with Okta. and click Finish.
-
Navigate to your newly-added application, click the Sign On tab, and click Identity Provider Metadata. An XML file will be displayed that contains the data you need for the next step.
-
In this step, you will prepare the following configuration, using the data from the XML file.
referer.hostname = {your data here}
provider = okta
onelogin.saml2.strict = true
onelogin.saml2.debug = false
onelogin.saml2.idp.entityid = {your data here}
onelogin.saml2.idp.single_sign_on_service.url = {your data here}
onelogin.saml2.idp.x509cert = {your data here}
onelogin.saml2.security.nameid_encrypted = false
onelogin.saml2.security.authnrequest_signed = false
onelogin.saml2.security.want_messages_signed = false
onelogin.saml2.security.want_assertions_signed = false
onelogin.saml2.security.want_assertions_encrypted = false
onelogin.saml2.security.want_nameid_encrypted = false
onelogin.saml2.security.want_xml_validation = true
You must modify the following on your configuration file.
-
referrer.hostname — Replace
{your data here}with your hostname. For example:dev-bls.okta.com. -
onelogin.saml2.idp.entityid — Replace
{your data here}with the value of theentityIDattribute in the XML file (shown below). -
onelogin.saml2.idp.single_sign_on_service.url — Replace
{your data here}with the value of theLocationattribute ofmd:SingleSignOnServicein the XML file (shown below). -
onelogin.saml2.idp.x509cert — Replace
{your data here}with the value of theds:X509Certificateelement in the XML file (shown below).

Data needed from the XML file
Note: Once you've prepared the configuration, set it aside for now. You will need to provide it to BlueSnap in later steps.
-
In the General tab, copy the URL provided in the Application Embed Link section. You will need to embed this link in your app so logged-in users can access their BlueSnap account.
-
Now, assign users to the application so they can have SSO access to their BlueSnap accounts (via the link from the previous step). Click the Assignment tab and complete the steps in the UI.\
Note: In the Username field, make sure to enter their BlueSnap account username.

-
Now, you will need to provide BlueSnap with your Okta configuration. Log in to your BlueSnap account and go to Settings > User Accounts.
-
In the Okta Integration section, turn on the Enable Okta Classic toggle, and paste your configuration data from step 11.
-
Click Submit.
Now, when an authenticated user clicks on the embedded link in your app, they will be able to access their BlueSnap account. The first time a user clicks on the link, they will need to log in using their credentials to establish the SSO connection. Further logins will not require the user to enter their credentials.
SSO Setup with Okta — Developer Portal
Follow the steps below to authenticate with BlueSnap using Okta's Developer Portal.
Requirements
You must have an Okta account and your app must be authenticated with Okta before proceeding.
-
Go to https://developer.okta.com/ and log in to your account. Make sure you're viewing your account in the Developer Portal view.
-
In your account dashboard, take note of the Org URL in the upper right portion of the screen. You will need this value when you configure SSO in your BlueSnap account.
-
Create a new application for BlueSnap by going to Applications and clicking Add Application.
-
Select Web as the platform and enter a name for the application, such as BlueSnap.
-
As you proceed through the app creation process, ensure you configure these settings:
| Setting | Description |
|---|---|
| Allowed Grant Types | In the Client acting on behalf of a user section, select the Authorization Code checkbox. |
| Login redirect URIs and Logout redirect URIs | BlueSnap Production: https://cp.bluesnap.com/jsp/developer_login.jsp BlueSnap Sandbox:
|
| Login initiated by | Select App Only. |
| Initiate Login URI | BlueSnap Production: https://cp.bluesnap.com/jsp/developer_login.jsp BlueSnap Sandbox: https://sandbox.bluesnap.com/jsp/developer_login.jsp |
-
Finish the app creation process and navigate to the settings page for the app.
-
In the General tab, note the Client ID and Client Secret in the Client Credentials section. You will need these values to configure SSO in your BlueSnap account.
-
You will need to assign users to the application so they can have SSO access to their BlueSnap accounts (via the link you copied). Click the Assignment tab and complete the steps in the UI.
-
Now, you will configure your SSO settings in your BlueSnap account. In your BlueSnap account, go to Settings > User Accounts.
-
In the Okta Integration section, make sure Enable Okta Login is turned on.
-
Configure these settings:
- Okta Domain — Enter your Org URL from Step 2.
- Okta Client ID — Enter your Client ID from Step 7.
- Okta Client Secret — Enter your Client Secret from Step 7.
-
Click Submit.
-
A URL will be displayed in the Okta Integration section. You can embed the URL in your app so logged-in users can access their BlueSnap accounts.
When a user clicks on the embedded link for the first time, they will need to enter their Okta credentials. This confirms the connection between their account in your app and their BlueSnap account. Future logins will not require the user to enter any credentials.
SSO Setup with Microsoft Entra ID
This guide provides detailed instructions for configuring Single Sign-On (SSO) between BlueSnap and Microsoft Entra ID (formerly Azure AD) using the Security Assertion Markup Language (SAML). By integrating BlueSnap with Entra ID, users can sign into their BlueSnap accounts using a single set of credentials managed by Entra ID, enhancing security by leveraging Entra ID’s password policies and two-factor authentication capabilities.
Prerequisites
Before beginning the configuration, ensure the following prerequisites are met:
- A Microsoft Entra ID tenant with an active subscription.
- A user account with at least Cloud Application Administrator privileges in the Microsoft Entra admin center.
- A BlueSnap account with administrative access to the Merchant Portal.
- You have Merchant ID, which should be placed into placeholder
<your-MID>in this guide.
Step 1: Configure Microsoft Entra ID for BlueSnap SSO
For additional information, refer to the Microsoft documentation.
Adding BlueSnap to Entra ID
- Sign in to the Microsoft Entra admin center with at least Cloud Application Administrator privileges.
- Navigate to Entra ID > Enterprise apps > New application.
- Enter the name of the existing application in the search box, and then select the application from the search results. For example, Microsoft Entra SAML Toolkit 1.
Configuring SAML-Based SSO
- In the Manage section of the left menu, select Single sign-on to open the Single sign-on pane for editing.
- Under the Manage section, select Single sign-on and choose SAML.
- In the Basic SAML Configuration section, click Edit and configure the following:
- Identifier (Entity ID) —
https://sandbox.bluesnap.com/jsp/developer_login.jsp - Reply URL (Assertion Consumer Service URL) —
https://sandbox.bluesnap.com/jsp/developer_login.jsp?mid=<YOUR MID> - Sign on URL —
https://sandbox.bluesnap.com/jsp/developer_login.jsp?mid=<YOUR MID>
- Identifier (Entity ID) —
- In the User Attributes & Claims section, click Edit to configure claims:
- Ensure the Unique User Identifier (Name ID) is set to
user.userprincipalname. This must match the BlueSnap username. - User's "User Principal Name" in Entra ID should be set to BlueSnap username.
- Ensure the Unique User Identifier (Name ID) is set to
- When creating a new user, for the User principal name, provide the BlueSnap username.
- In the SAML Signing Certificate section, download the Federation Metadata XML file. This file contains the necessary configuration details (Login URL, Entra ID Identifier, and certificate).
- If no certificates exist, create a new one.
Output from Entra ID Configuration
After completing the above steps, you should have the following:
- Certificate — The X.509 certificate from the Federation Metadata XML.
- Login URL — The SSO URL provided by Entra ID.
- Entra ID Identifier — The unique identifier for the Entra ID instance.
- Users with their "User Principal Name" set to their BlueSnap username.
Step 2: Configure BlueSnap for SSO with Entra ID
Note
BlueSnap’s SSO configuration is compatible with Entra ID using the Okta Classic settings, as both follow SAML 2.0 standards.
Accessing BlueSnap SSO Configuration
- Log in to your BlueSnap Merchant Portal as an administrator.
- Navigate to Settings > User Accounts > SAML Authentication Configuration.
- Enable the Okta Classic option under SAML Authentication Configuration, as Entra ID uses a compatible SAML configuration.
Configuring SAML Parameters
Using the details from the Entra ID Federation Metadata XML, configure the following parameters in BlueSnap’s SAML Authentication Configuration:
provider = okta
onelogin.saml2.strict = true
onelogin.saml2.debug = false
onelogin.saml2.idp.entityid = <Entra ID Identifier>
onelogin.saml2.idp.single_sign_on_service.url = <Login URL>
onelogin.saml2.idp.x509cert = <Certificate>
onelogin.saml2.security.nameid_encrypted = false
onelogin.saml2.security.authnrequest_signed = false
onelogin.saml2.security.want_messages_signed = false
onelogin.saml2.security.want_assertions_signed = false
onelogin.saml2.security.want_assertions_encrypted = false
onelogin.saml2.security.want_nameid_encrypted = false
onelogin.saml2.security.want_xml_validation = true- Replace
<Entra ID Identifier>with the Entra ID Identifier from the Federation Metadata XML. - Replace
<Login URL>with the Login URL from the Federation Metadata XML. - Replace
<Certificate>with the X.509 certificate content from the Federation Metadata XML (remove any -----BEGIN CERTIFICATE----- and -----END CERTIFICATE----- tags).
SSO Setup with OneLogin
Follow the steps below to authenticate with BlueSnap using OneLogin.
Requirements
You must have a OneLogin account and your app must be authenticated with OneLogin before proceeding.
-
Log in to your OneLogin account and go to Applications > Applications > Add App.
-
In the Find Applications section, search for SAML Test Connector. Select SAML Test Connector (IdP w/ attr w/ sign response) from the search results list.
-
Enter a Display Name for the app, such as BlueSnap, and click Save.
-
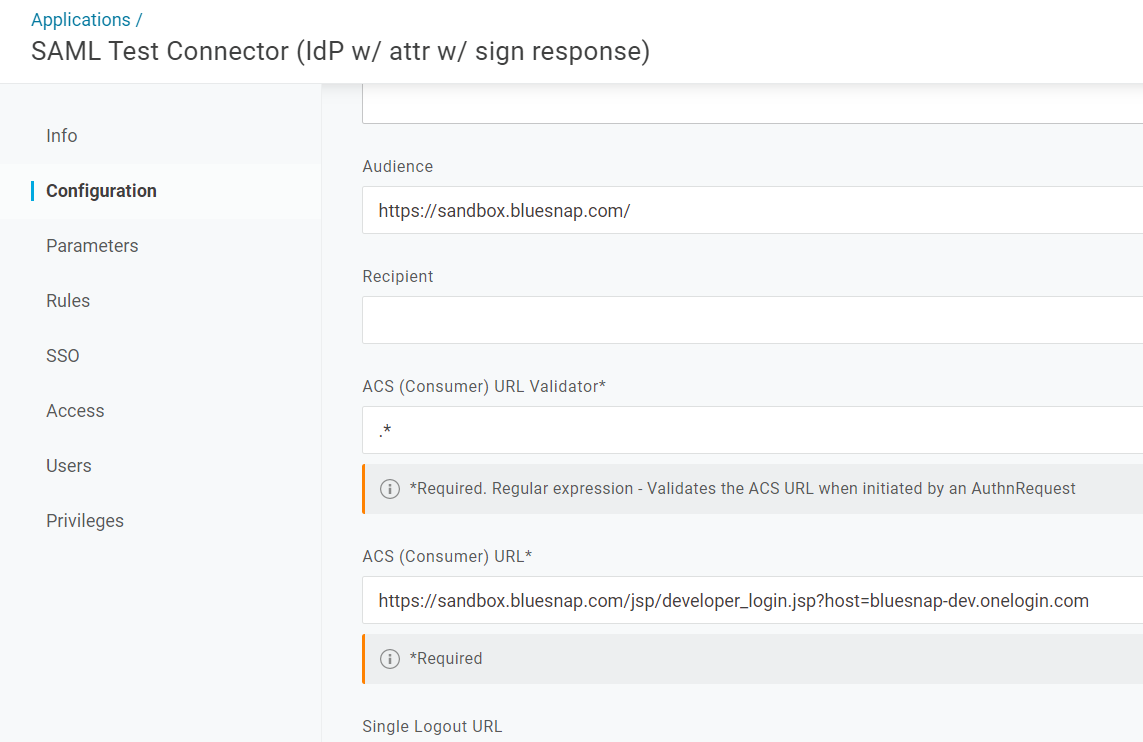
Click the Configuration tab and configure the following settings:
| Setting | Description |
|---|---|
| Audience | Sandbox: https://sandbox.bluesnap.com/ Production: https://cp.bluesnap.com/jsp/developer_login.jsp |
| ACS (Consumer) URL Validator | Enter .* |
| ACS (Consumer) URL | Sandbox: https://sandbox.bluesnap.com/jsp/developer_login.jsp?host=bluesnap-dev.onelogin.com Production: https://cp.bluesnap.com/jsp/developer_login.jsp?host=bluesnap-dev.onelogin.com |

-
Click Save.
-
You will need to assign users to the BlueSnap app so they can have SSO access to their BlueSnap accounts. Click the Users tab and complete the steps in the UI.\
Note: You can change a user's login username for the app by clicking the user and modifying the Login field.
A user can access their BlueSnap account by first logging into their OneLogin account and clicking on the BlueSnap app. The first time a user accesses their BlueSnap account, they will be asked to log in using their credentials. Subsequent logins will not require the user to enter their credentials.
Updated 3 months ago
