Legacy NetSuite Setup
Learn how to connect NetSuite and BlueSnap for a unified payment processing solution.
This guide is for our legacy NetSuite integration. Learn how to take advantage of our latest solution, BlueSnap Global Payments for NetSuite.
NetSuite can be used to manage inventory, track financials, host e-commerce stores, complete your e-commerce workflow, automate cash reconciliation, accept payments on invoices, and for enterprise resource planning (ERP). BlueSnap understands the importance of NetSuite to your business so we offer multiple ways to connect your NetSuite environment to BlueSnap and take advantage of our payment processing.
If you are using NetSuite to make payments within NetSuite, use BlueSnap’s AR Automation for invoices.
If you are making payments using your online webstore or from within your NetSuite account use the
NetSuite plugin
Note: NetSuite is a registered trademark of NetSuite Inc. No endorsement or sponsorship by NetSuite Inc. is hereby expressed or implied.
NetSuite Plugin Setup
Supported features
Auth/Capture and Separate Auth and Capture
Built-in Fraud Prevention and Risk Management
Cash Sales (Auth Capture)
Chargeback Management
Multiple Currencies
Partner Sandbox Testing
Payment Methods: ACH/ECP and Credit/Debit Cards
Payment Optimization
Sales Order (Separate Auth and Capture)
Vaulted Shoppers
In addition, BlueSnap supports NetSuite's Webstore and NetSuite's Invoicing.
Requirements
NetSuite and BlueSnap accounts
You must have accounts at both NetSuite and BlueSnap to proceed.
If you need a NetSuite account, go to the NetSuite website to sign up.
If you need a BlueSnap account, go to the BlueSnap website to get started.
Supported currencies
BlueSnap supports the currencies listed here. We recommend configuring your store to only accept currencies supported by BlueSnap.
Supported countries
BlueSnap supports the countries listed here. If a shopper is located in one of these supported countries, they will be able to purchase with the BlueSnap payment module.
# PCI compliance
Your PCI requirements will be determined during a discussion with your BlueSnap Implementation Specialist.
Before you begin
Contact an Implementation Specialist or Merchant Support and ask for the BlueSnap bundle to be shared with your NetSuite account. You'll need to provide your NetSuite Account ID, which can be found in NetSuite by going to Setup > Company > Company Information.
Step 1: Configure your BlueSnap account settings
Complete these steps in your Merchant Portal for production or sandbox.
-
Get your BlueSnap API credentials and define the authorized IP addresses for your server. Both of these actions are performed on the same page; for instructions click here.
-
Set up your statement descriptor. The statement descriptor is the description that appears on the shopper's credit card statement or bank statement for each transaction and helps the shopper identify the transaction.
- Go to Settings > General Settings.
- In the Branding Settings section, enter a Default Statement (Soft) Descriptor and Support Phone Number (both appear on the shopper's statement).
- Click Submit.
-
To get paid, you need to configure your payout settings. Refer to Payout for more information.
Step 2: Install and configure the BlueSnap bundle
Complete these steps in your NetSuite account to install and configure the BlueSnap bundle.
-
Go to Customization > SuiteBundler > Search & Install Bundles and search "BlueSnap".
-
Click the BlueSnap bundle and click Install.\
Note: The installation may take a few moments.
-
When the installation is complete, go to Customization > Lists, Records, & Fields > Record Types.
-
Next to the BlueSnap Settings record type, click New Record.
-
Configure the following settings:
- BlueSnap API Main URL Path — Enter
https://ws.bluesnap.comfor production orhttps://sandbox.bluesnap.comfor sandbox. - BlueSnap User Key: — Enter your BlueSnap API user key for production (or sandbox for testing purposes).
- BlueSnap Password: — Enter your BlueSnap API password for production (or sandbox for testing purposes).
- BlueSnap API Main URL Path — Enter
-
Click Save.

Creating a Cash Sale (Auth/Capture)
To create a Cash Sale in NetSuite for a card payment received via phone, follow these steps:
-
Go to Transactions > Sales > Enter Cash Sales.
-
From the Customer drop-down, select the shopper (or create a new one).
-
In the Items section, select an item, enter an amount, and click Add.
-
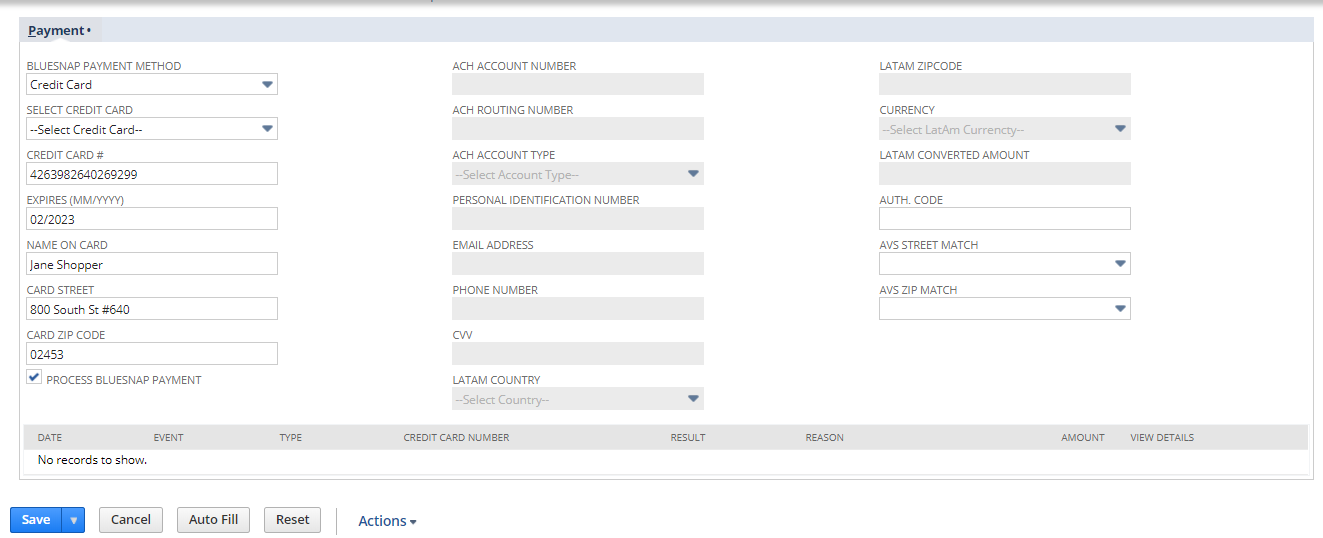
In the Billing section, complete these fields:
- Credit Card #
- Expires (MM/YYYY)
- Name on Card
- Card Street
- Card Zip Code
-
Select Process BlueSnap Payment.
-
Click Save.

Updated 3 months ago
