
Embedding a checkout page
What is an embedded checkout page?
By default, a hosted checkout page displays as a separate page outside of your site.
Checkout page on an external site

If you prefer, you can embed the hosted checkout page in your website to give the shopper the seamless appearance of staying on your site while they complete checkout.
Checkout page embedded on the merchant site

The checkout page is embedded in your website using an HTML <iframe> tag. This tag creates a frame in your web page and then the checkout page is embedded within that frame.
How to embed the checkout page
When you are ready to go live, follow the steps below to embed the checkout page on your site in an <iframe> tag.
Make sure you have set up an iframe skin
To set up an embedded checkout page, you must set up an iframe skin when you customized the skin. The iframe skin is specially designed for optimal appearance when embedded via a
<iframe>tag. For details, see Customize your checkout page skins.Note: Apple Pay and PayPal are not supported when using an iframe.
-
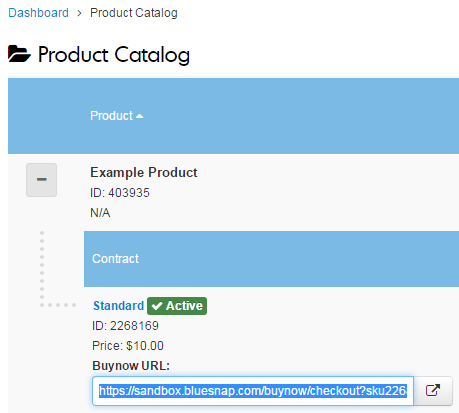
In the Merchant Console, go to Product Catalog > Products in the left pane.
-
Expand the product to view the contracts under it, and then go to the relevant contract.
-
Copy the BuyNow URL from the contract.
-
On your website, create an
<iframe>tag where you want to display your checkout page, and paste the BuyNow URL into the src parameter. For example:
<iframe src="https://sandbox.bluesnap.com/buynow/checkout?sku1234567=1&storeid=98765"></iframe>
Enabling Google Pay when using an iframe
To enable Google Pay in an iframe on a mobile device, the hosted top frame (which declares the
iframeelement) must include theallowPaymentRequestattribute of theHTMLIFrameElement.This
allowPaymentRequestattribute indicates that the Payment Request API can be invoked on a cross-origin iframe. If this is not included, the Google Pay button is not shown.For example:
<iframe allowPaymentRequest='true' src="myCheckoutPage" name='ifrm' id='ifrm'></iframe>
Enabling MasterPass when using an iframe
In the page containing the iframe with the checkout form, add this script:
<script type="text/javascript" src="https://sandbox.masterpass.com/lightbox/Switch/integration/MasterPass.client.js"></script>
Post-purchase redirect for an embedded checkout page
When a shopper completes a purchase, you can redirect that shopper to a specific URL that you define. See Redirect after a purchase.
With an embedded checkout page, the redirect URL will open inside the iframe by default. If you want the redirect to open in the top frame (i.e. the main window), make sure to select the Top frame redirect option when you set up your iframe skin. If you already created your iframe skin but did not select this option, you can contact Merchant Support to have it enabled.
